Kinsmen Web Panel
A modern, full-featured hosting control panel built for AlmaLinux servers. Manage accounts, domains, email, databases, DNS, SSL, backups, and more — all from a clean, fast web interface.
Fast & Lightweight
Built on CodeIgniter 4 with optimised PHP-FPM pools per account
Secure by Default
Isolated user accounts, ModSecurity, 2FA, SELinux, firewall management
Auto-Healing
Built-in cron jobs monitor load, mail delivery, and DNS health
Requirements
Kinsmen Web Panel requires a fresh AlmaLinux 8 or 9 VPS or dedicated server. Do not install on a server with an existing control panel (cPanel, Plesk, etc.).
| Component | Minimum | Recommended |
|---|---|---|
| OS | AlmaLinux 8 | AlmaLinux 9 |
| CPU | 2 cores | 4+ cores |
| RAM | 2 GB | 8 GB+ |
| Disk | 20 GB SSD | 80 GB+ SSD |
| PHP | 8.2 (CLI for panel) | 8.3 |
| Root Access | Required — runs as root | |
| Ports open | 22 (SSH), 80, 443, 2082, 2083, 2095, 25, 587, 465, 143, 993, 110, 995 | |
Installation
KWP is a licensed commercial panel. Installation requires an active license with your server's primary IP registered in your client area. The installer is a single command — it prompts for your admin credentials, verifies the license, then configures the full stack automatically.
Step 1 — Purchase a License
Visit your client area and purchase a Kinsmen Web Panel license. During checkout you will be prompted to enter your server's primary IP address. This is the IP that the panel will be installed on.
Step 2 — Prepare Your Server
KWP requires a fresh AlmaLinux 8 or 9 (or compatible RHEL-based) server. Do not install on a server with an existing control panel (cPanel, CWP, etc.) or web stack — the installer configures nginx, Apache, PHP-FPM, MariaDB, Postfix, Dovecot, and BIND from scratch.
- AlmaLinux 8 or 9 (Rocky Linux / RHEL 8/9 also supported)
- Minimum 2 GB RAM, 20 GB disk, 1 vCPU
- Root SSH access
- Outbound internet access (for package downloads)
- Server primary IP registered in your license
Set the server's fully-qualified hostname before running the installer — it is baked into the panel config, nginx vhosts, and SSL certificates:
hostnamectl set-hostname srv1.yourhost.comStep 3 — Run the Installer
Log in as root and run:
bash <(curl -fsSL https://client.thekinsmen.net/kinsmen-panel/install.sh) "YourAdminPassword"
The installer verifies your license, downloads the panel, and
configures the full stack automatically. The process takes 5–15
minutes depending on server speed. Admin username is always
root.
Optionally, pass server details as flags to pre-populate all settings in one shot — no post-install configuration needed:
bash <(curl -fsSL https://client.thekinsmen.net/kinsmen-panel/install.sh) \
    "YourAdminPassword" \
    --hostname srv1.yourhost.com \
    --ns1 ns1.yourhost.com \
    --ns2 ns2.yourhost.com \
--email [email protected]What the Installer Configures
License verification
The installer checks your server's primary IP against your active subscription. If no active license is found for this IP, the download is refused. Purchase or update your license at client.thekinsmen.net.
System packages
Installs nginx, Apache (port 8080 backend), MariaDB, Postfix, Dovecot, BIND, Redis, certbot, and PHP 7.4 / 8.1 / 8.3 via Remi repositories.
Panel application
Deploys KWP to /var/www/kinsmen-panel, creates
the SQLite panel database, and sets up your admin account with
the email and password you provided.
Service configuration
Configures nginx to serve the admin panel on port 2083 and the user panel on port 2082 via FastCGI with a dedicated PHP-FPM pool.
Mail stack
Configures Postfix with virtual mailboxes, Dovecot with LMTP delivery, SpamAssassin, and OpenDKIM for per-domain DKIM signing.
Security hardening
Configures firewalld, SELinux, Fail2ban, and ModSecurity. Sets up the panel's own SSL certificate for HTTPS on port 2083.
Maintenance crons
Installs automatic cron jobs: mail repair (every 5 min), high load fix (every 5 min), auto SSL issuance, DNS zone health, and Redis cache scan.
Post-Installation
If you used the --hostname, --ns1,
--ns2, and --email flags, everything is
pre-configured and you can create accounts immediately. Otherwise,
log in to the admin panel and set these before creating any hosting
accounts:
- Server hostname — Admin → Settings → General
- Nameservers NS1 and NS2 — required for DNS zone creation
- Admin email — for notifications and SSL certificates
First Login
After installation, access the panels at:
| Panel | URL | Default Credentials |
|---|---|---|
| Admin Panel | http://your-server-ip:2083 |
root / password you set during installation
|
| User Panel | http://your-hostname:2082 |
Created per hosting account |
| phpMyAdmin | https://your-hostname:2095 |
Auto-login via admin panel |
| Webmail | https://webmail.domain.com |
Email address + password |
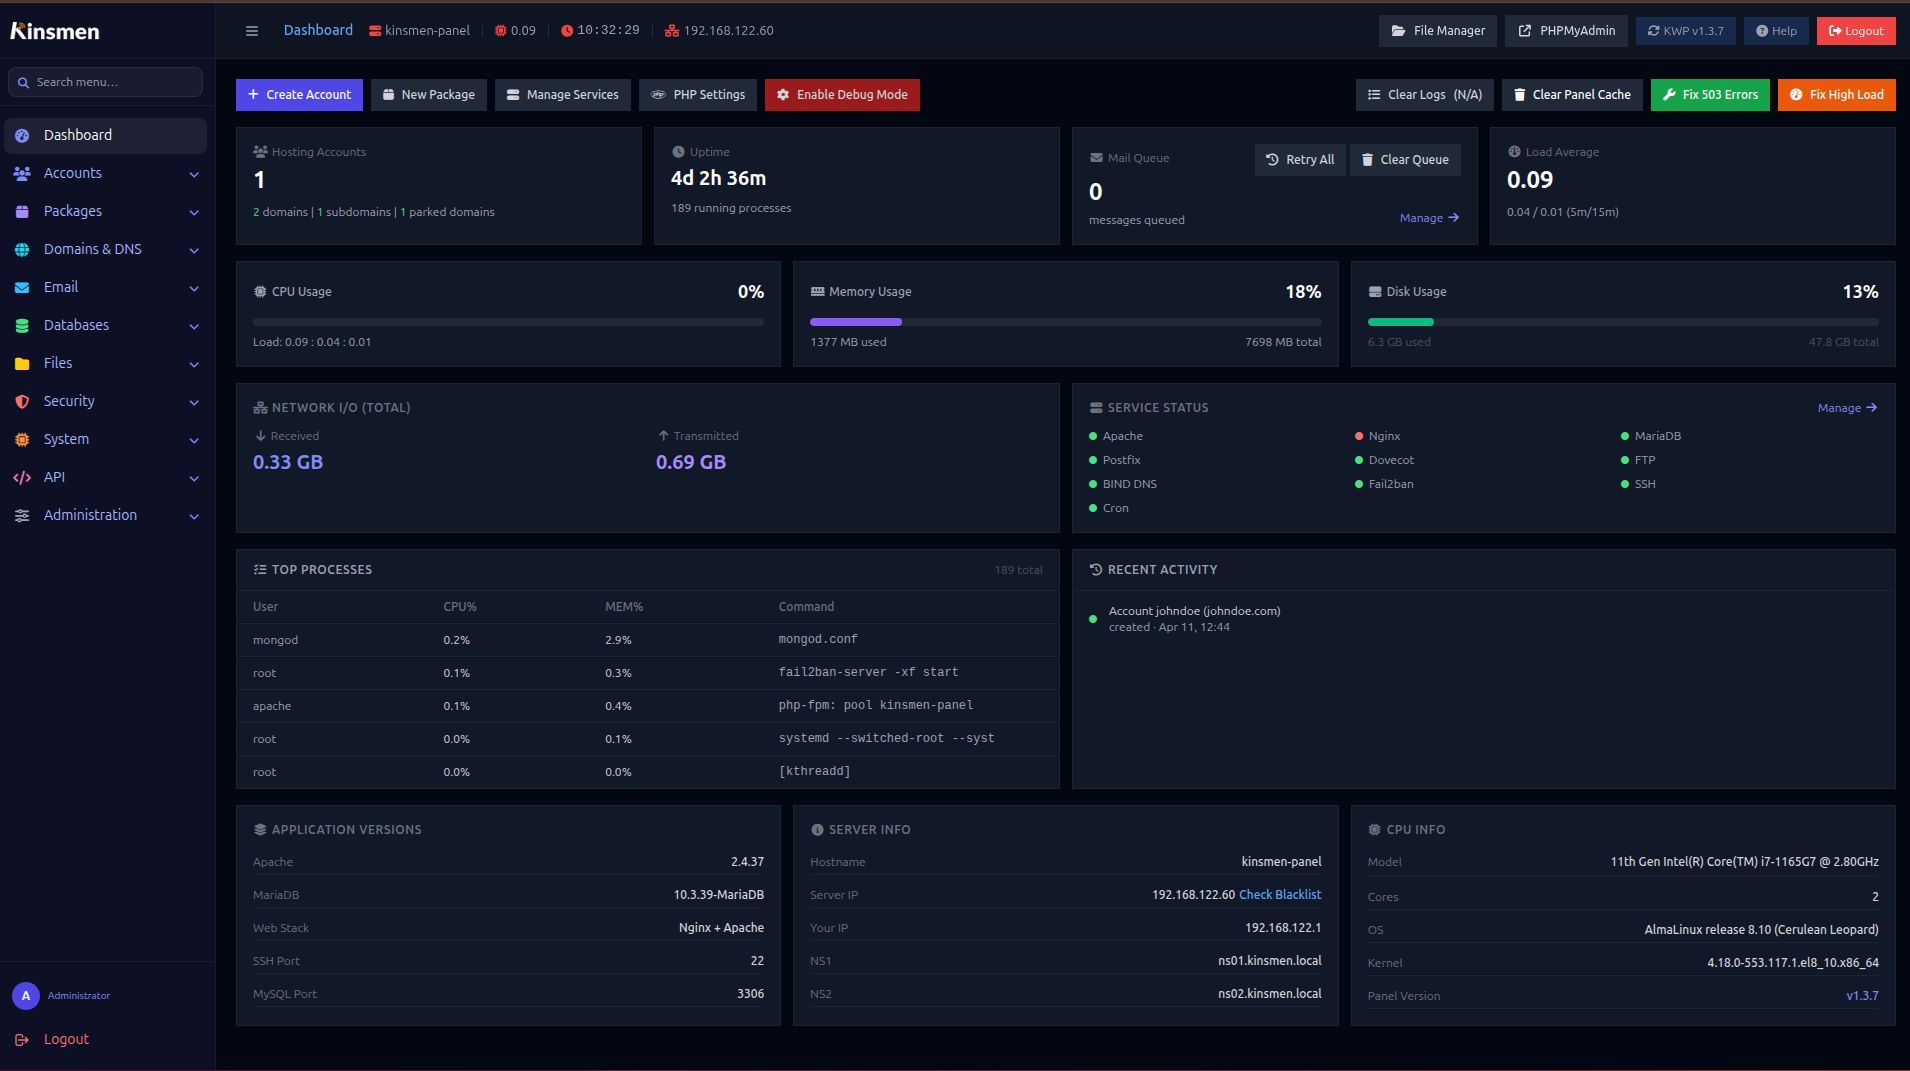
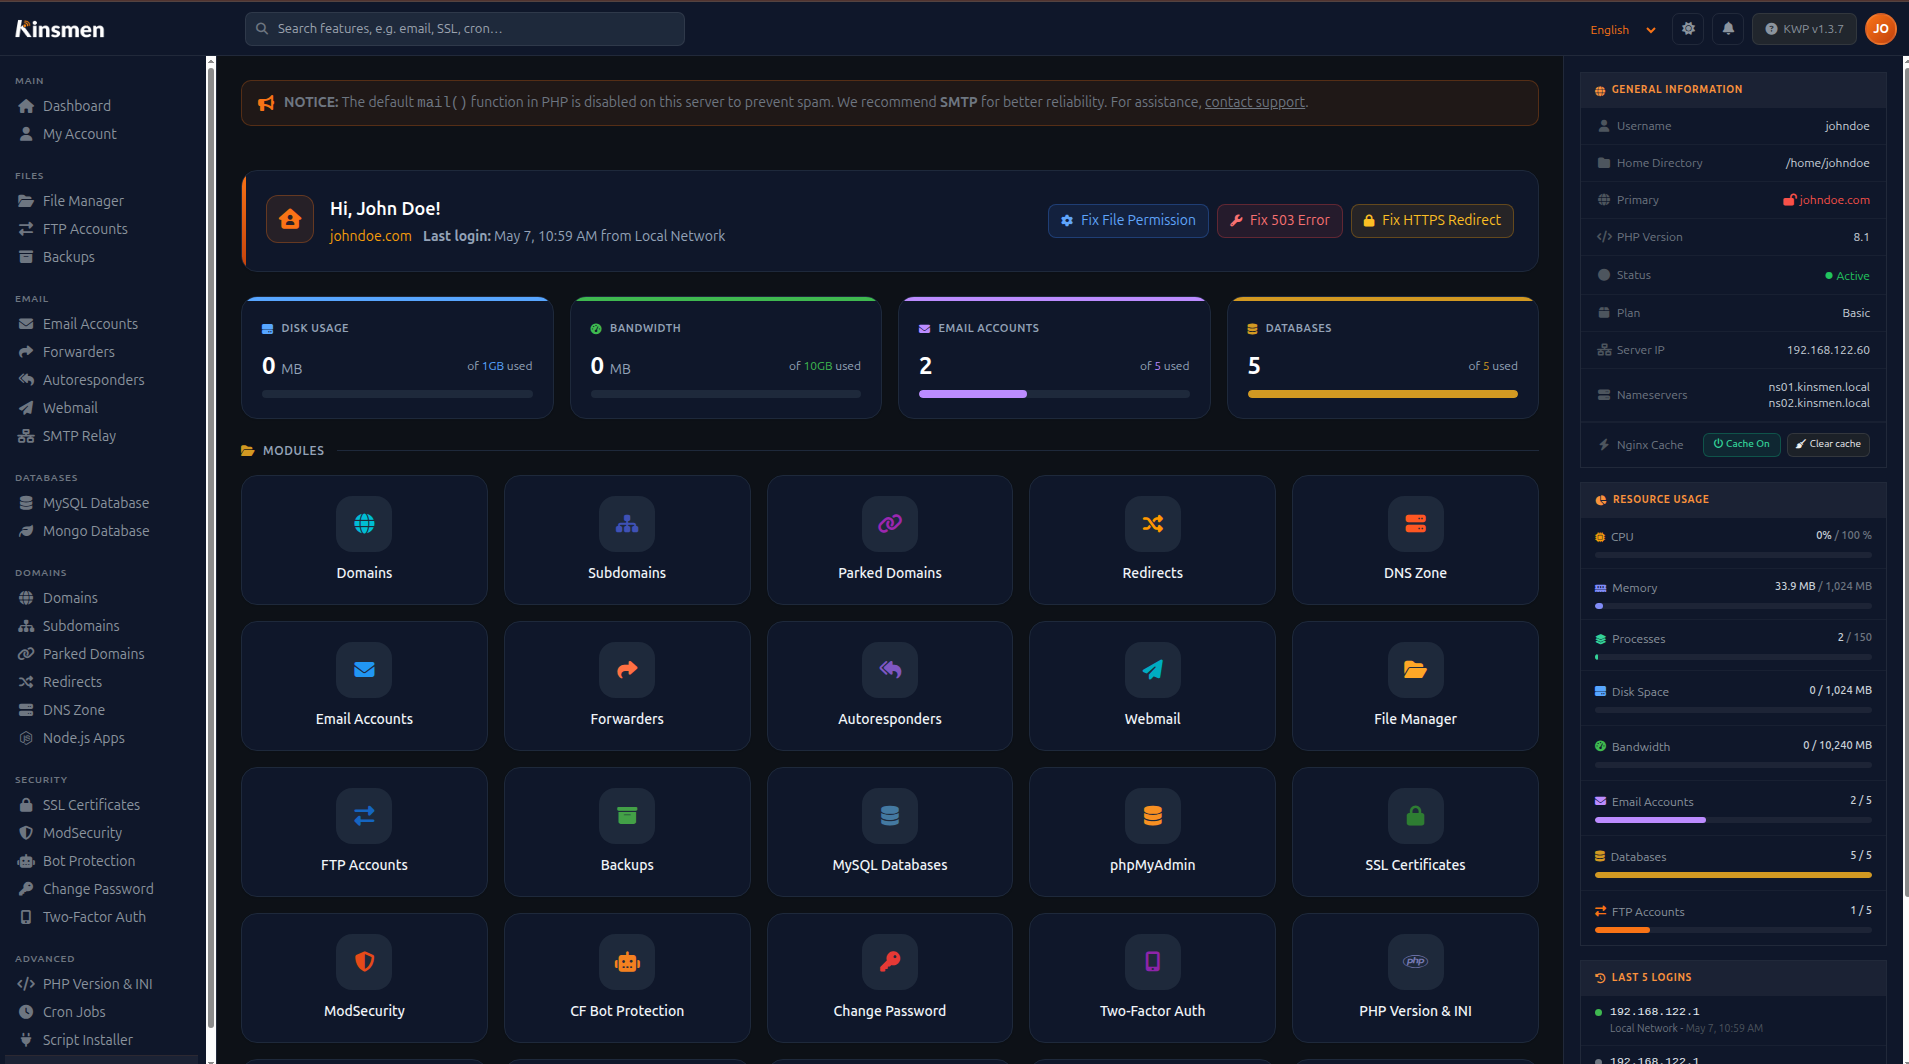
Admin Dashboard
The dashboard provides a real-time overview of server health, account statistics, and quick-action buttons.
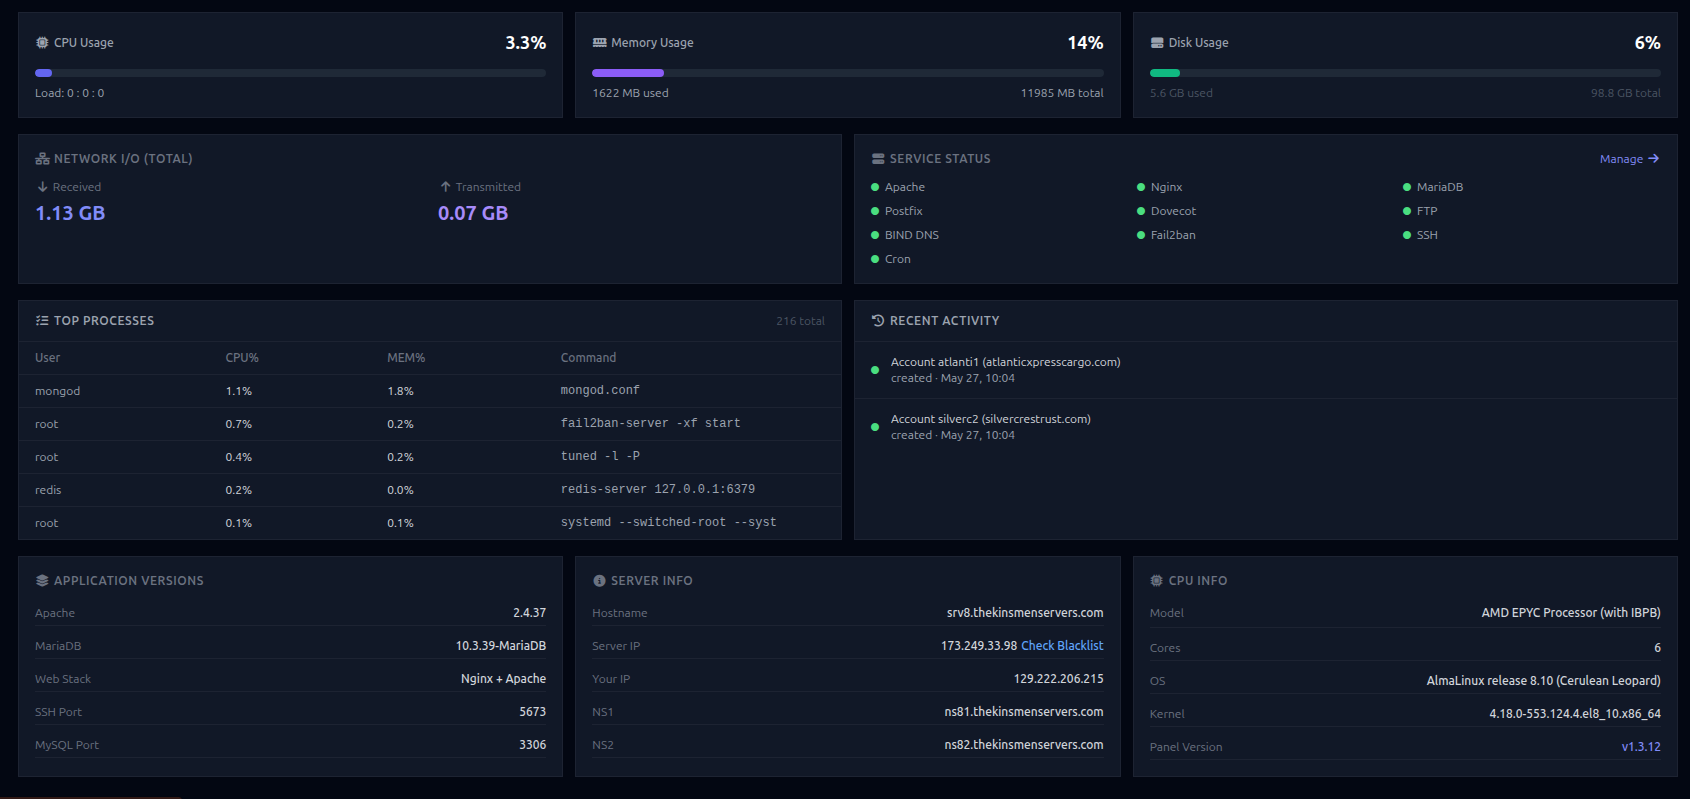
Server Metrics
Live widgets update every 10 seconds showing:
- CPU usage — overall and per-core breakdown
- Memory — used, buffered, cached, and swap
- Load average — 1, 5, and 15-minute averages
- Network I/O — inbound and outbound traffic rates
- Running processes — top resource consumers
- Service status — nginx, Apache, MySQL, Postfix, Dovecot, BIND, Redis
Quick Actions
Buttons at the top of the dashboard provide instant access to common repairs:
| Button | What it does |
|---|---|
Fix 503 Errors |
Restarts all crashed PHP-FPM pools; recreates missing sockets |
Fix High Load |
Detects D-state worker storms and kills runaway processes |
Fix HTTPS Redirect |
Corrects broken HTTP→HTTPS redirect configs |
Clear Panel Cache |
Clears CI4's file cache (useful after config changes) |
Fix High Load or check which account has the most
D-state workers with
ps aux | awk '$8=="D"' | awk '{print $1}' | sort | uniq -c | sort
              -rn
.
Account Management
Each hosting account has its own Linux user, PHP-FPM pool, nginx/Apache vhost, DNS zone, mail domain, and panel login.
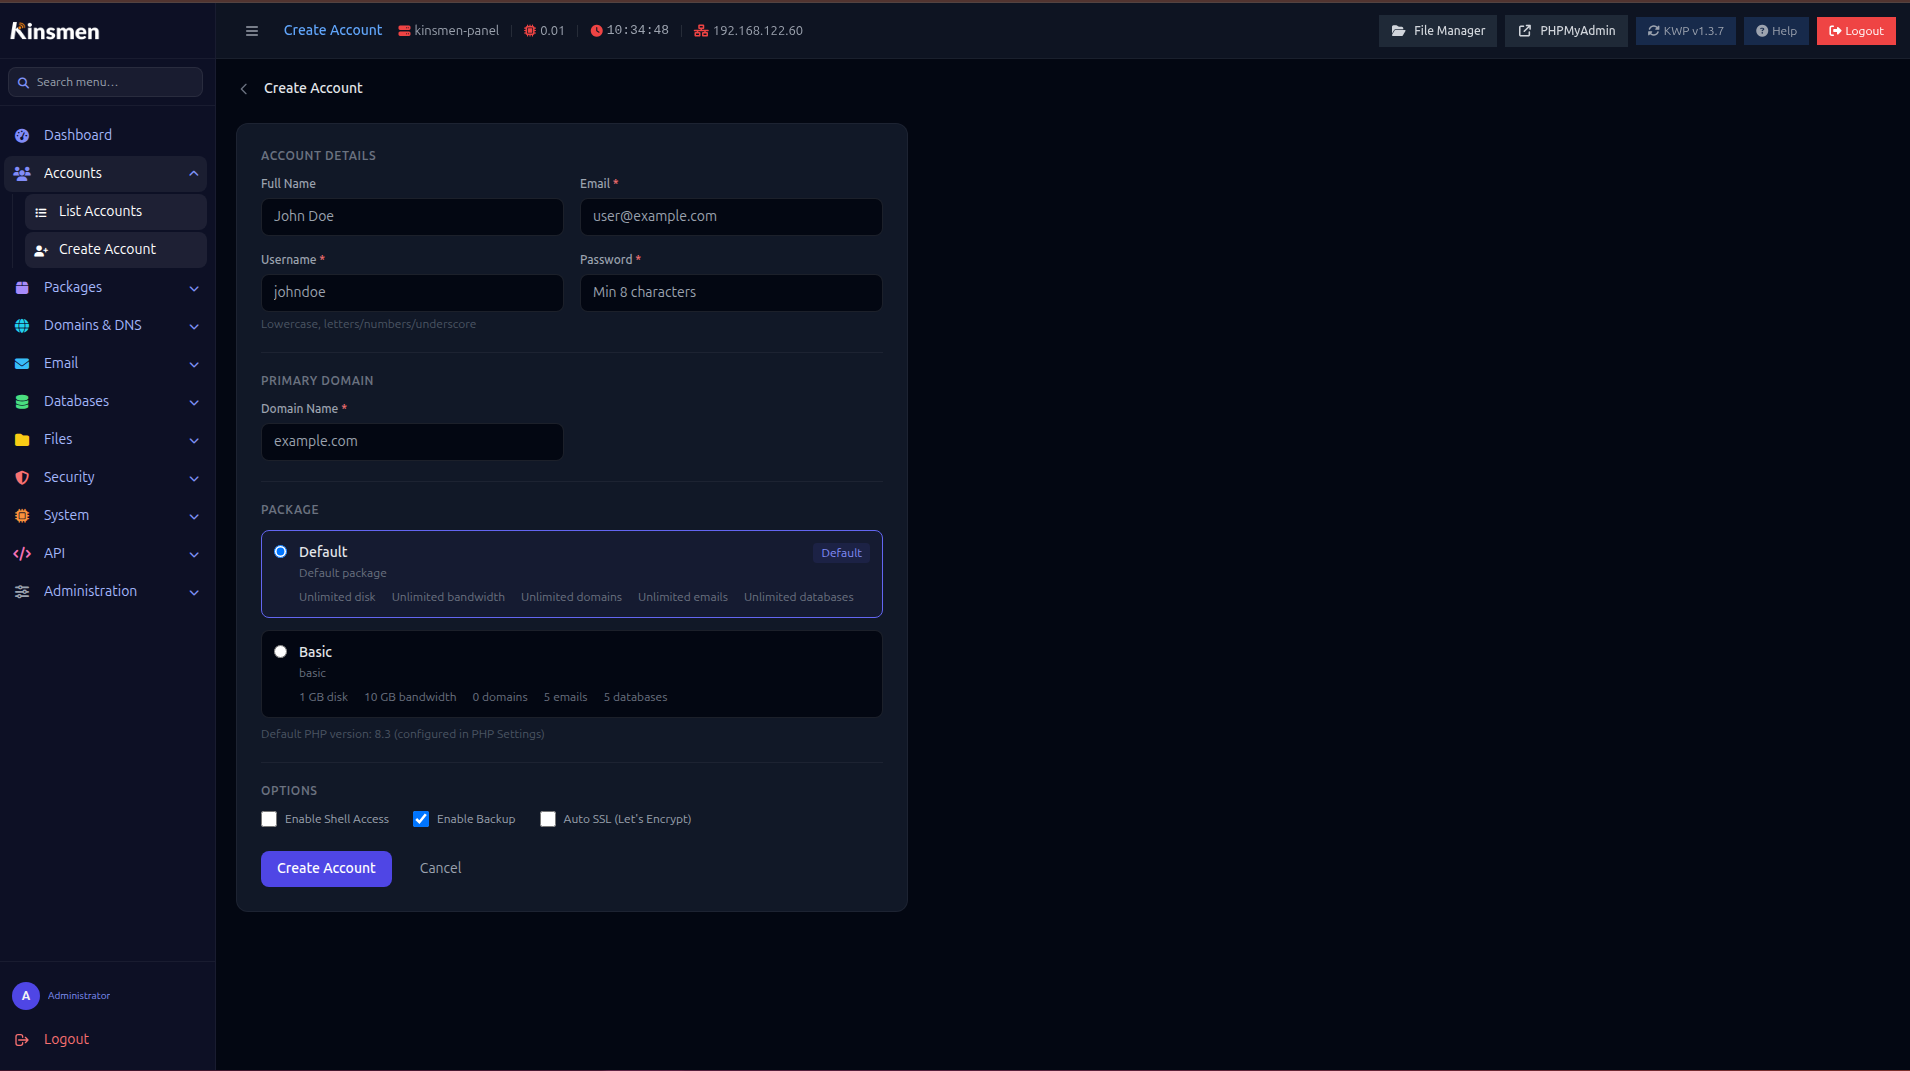
Creating an Account
Go to Admin → Accounts → Create Account. Fill in:
- Username — lowercase, alphanumeric (becomes the Linux username)
- Password — panel login password (use the generate button)
-
Primary domain — e.g.
example.com - PHP version — 7.4, 8.1, or 8.3
- Package — resource limits template
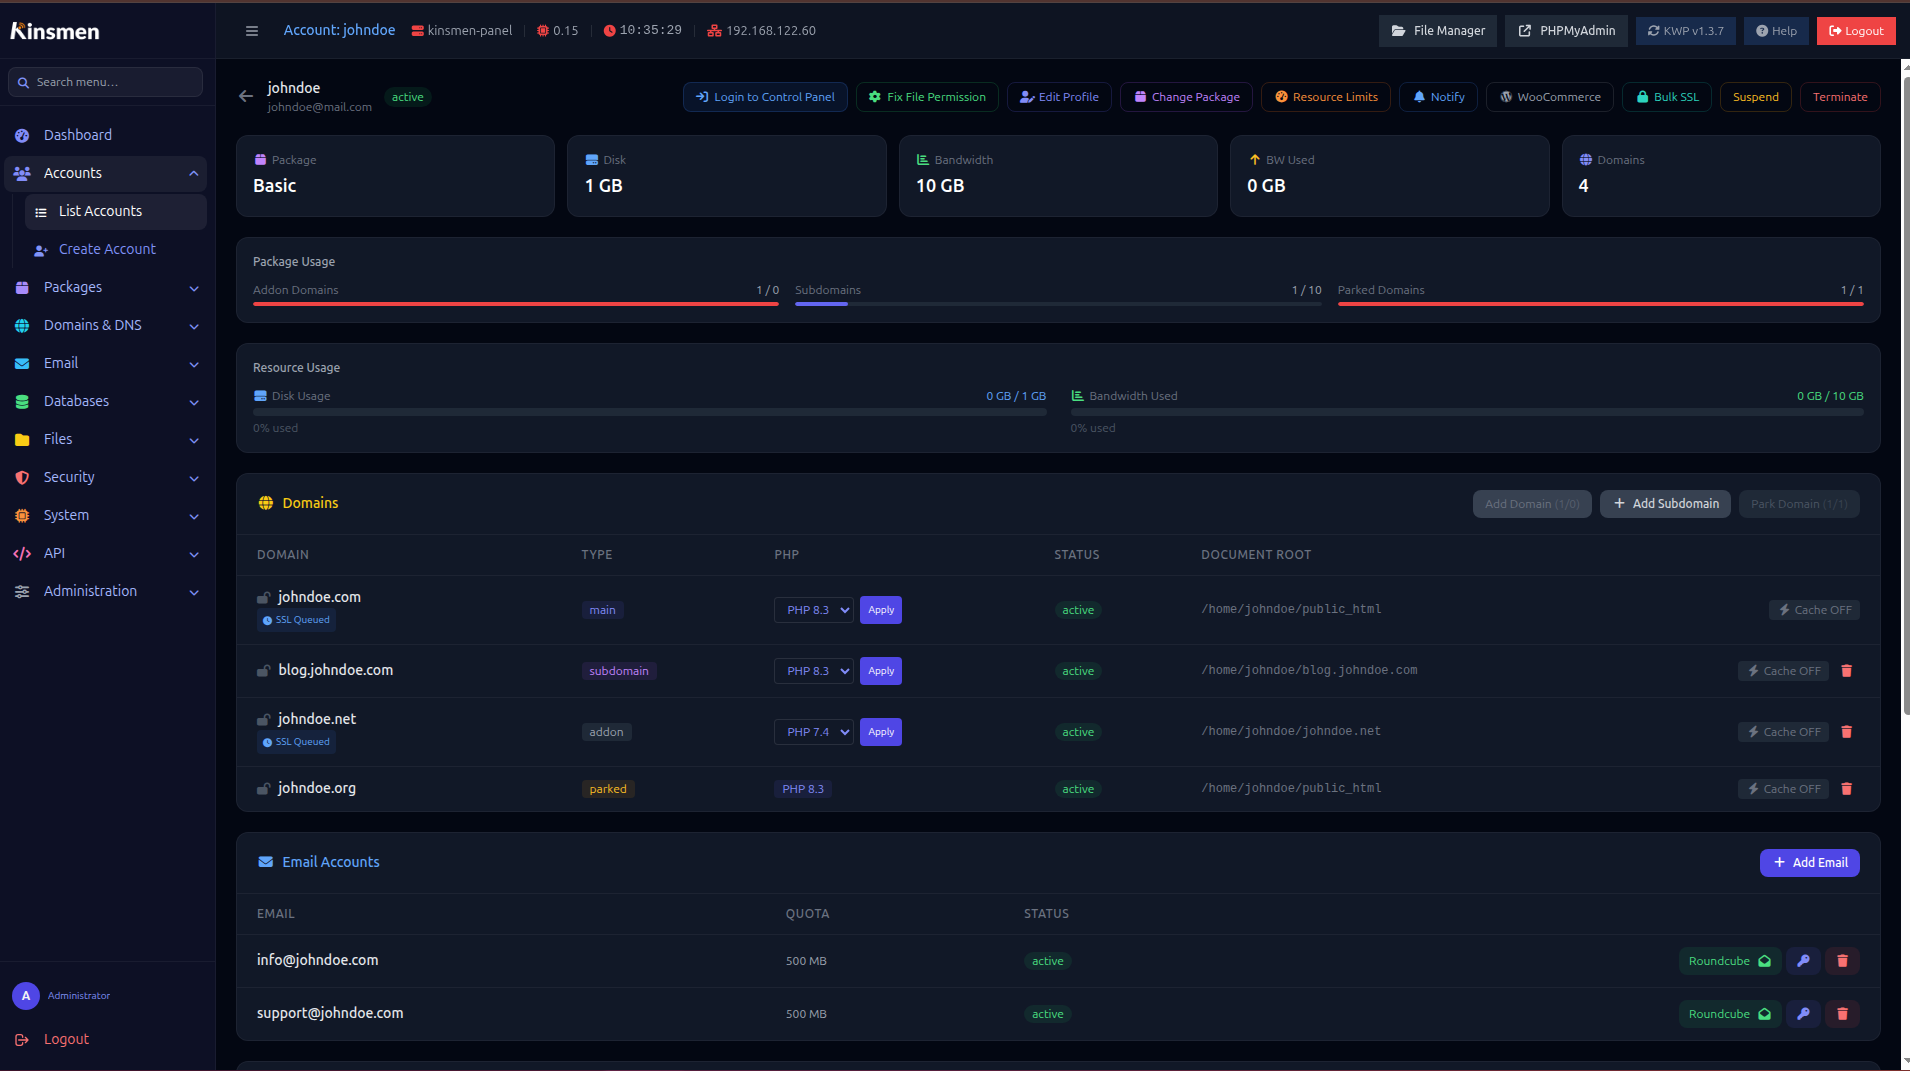
Account Detail Page
Click any account to access its detail page, which includes:
- Domain list with per-domain cache, PHP version, and SSL status
- Email accounts
- Databases (MySQL + MongoDB) with Dump and Restore buttons
- FTP accounts
- Activity log and login history
- Resource limits editor (PHP workers, memory, timeouts)
Resource Limits
Click Resource Limits on the account header to set:
| Setting | Description | Default |
|---|---|---|
| PHP Workers | Max concurrent PHP-FPM processes for this account | 5 |
| Request Timeout | Max PHP execution time per request (seconds) | 60 |
| Disk Quota | Maximum disk space in MB (-1 = unlimited) | Package default |
| Bandwidth | Monthly bandwidth limit in MB (-1 = unlimited) | Package default |
Account Actions
- Login to Control Panel — auto-login to the account's user panel
- Fix File Permissions — resets ownership and ACLs for the home directory
- WooCommerce Mode — one-click WooCommerce optimisation (see WooCommerce Mode)
- Bulk SSL — issues Let's Encrypt wildcard certs for all account domains at once
- Suspend / Unsuspend — blocks HTTP access while keeping data intact
- Terminate — permanently deletes the account, all files, databases, and email
Packages
Packages define resource limits applied to accounts at creation. Go to Admin → Packages to manage them.
Package Settings
| Setting | Description |
|---|---|
| Max Domains | Addon domains allowed (-1 = unlimited) |
| Max Subdomains | Subdomains per account |
| Max Email Accounts | Email addresses per account |
| Max Databases | MySQL databases per account |
| Disk Quota (MB) | Storage limit |
| Bandwidth (MB) | Monthly transfer limit |
| PHP Workers | Max PHP-FPM children |
| Request Timeout | PHP-FPM request_terminate_timeout |
Domain Management
KWP supports four domain types per account.
Domain Types
| Type | Description | Has DNS Zone |
|---|---|---|
| Main | Primary domain created with the account | Yes |
| Addon | Independent domain with its own document root and PHP-FPM pool | Yes |
| Subdomain |
Subdomain of the main domain; document root at
~/subdomain.domain.com/
|
A record only |
| Parked | Alias domain; points to the main domain's content via CNAME | CNAME zone |
Per-Domain Controls
From the account detail page, each domain row has:
- PHP version selector — change PHP version inline
- Cache toggle — enable/disable nginx proxy cache
- Cache clear — purge cached files immediately
- Remove — delete domain with full cleanup (email, SSL, nginx configs, DNS)
DNS Management
KWP manages BIND DNS zones for all hosted domains. It also supports Cloudflare DNS as an optional overlay.
DNS Zone Records
Go to Admin → DNS to view all zones. Click a domain to edit its records.
Each zone is automatically created with:
- SOA record pointing to NS1
- NS records (NS1 and NS2 from Server Settings)
- A record for root domain → server IP
- A record for
www -
A records for
mail,ftp,panel,webmail - MX record pointing to
mail.domain.com - SPF TXT record
- DMARC TXT record
- DKIM TXT record (auto-generated 2048-bit key)
Adding Records
Supported record types: A, AAAA,
CNAME, MX, TXT,
NS, SRV, CAA.
Cloudflare DNS Integration
When enabled in Admin → Cloudflare DNS, KWP can manage DNS through Cloudflare's API. Domains can be individually opted in — it is not automatic when you add a domain.
To add a domain to Cloudflare:
- Enable Cloudflare and save your API token in Admin → Cloudflare DNS
- Use Recreate All CF Zones to push existing domains, or add them individually through the DNS zone editor
SSL / HTTPS
KWP issues wildcard SSL certificates (e.g.
*.domain.com + domain.com) via Let's
Encrypt using DNS-01 challenge — meaning no HTTP challenge port is
needed.
Auto SSL
SSL is queued automatically when a domain is created. Once DNS propagates, the panel issues the cert and updates all nginx vhosts to HTTPS. Status is shown in the domain list.
Bulk SSL
Click Bulk SSL on the account detail page to immediately queue SSL for all domains on an account.
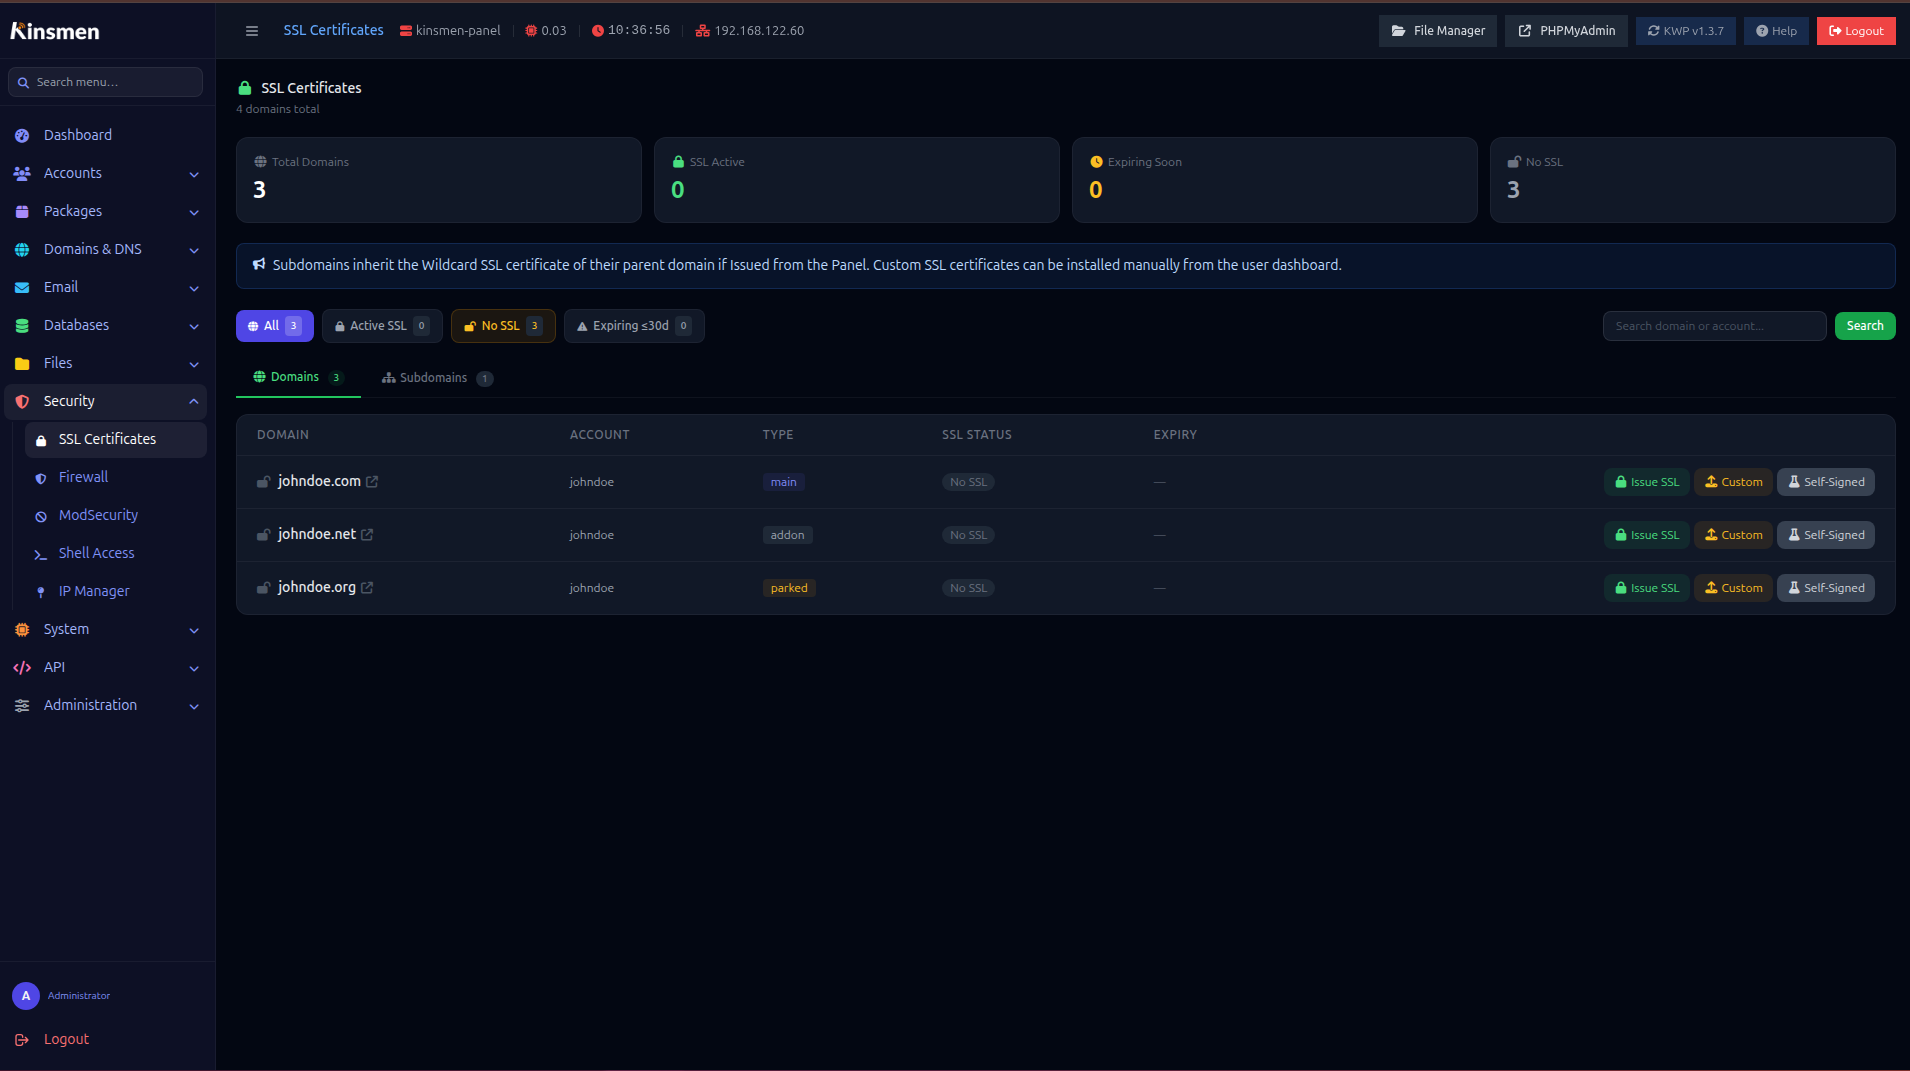
Manual SSL (Admin)
Go to Admin → SSL to view all certificates, force renewals, or check expiry dates.
Host SSL
The panel hostname itself (port 2083) also needs SSL. Go to Admin → Host SSL to issue a certificate for the panel's own domain.
Mail SNI
After SSL is issued, KWP automatically configures Dovecot and
Postfix SNI so mail.domain.com,
imap.domain.com, smtp.domain.com etc. all
present the correct wildcard certificate. This runs via
Admin → Mail Delivery → Apply Mail SNI and also
runs automatically after each SSL issuance.
Email Management
KWP provides a full mail stack: Postfix (SMTP/submission), Dovecot (IMAP/POP3/LMTP), OpenDKIM, SpamAssassin, and Roundcube webmail.
Creating Email Accounts
From the account detail page, scroll to Email Accounts and click Add Email. Each account gets:
-
A Dovecot mailbox in
/var/vmail/domain.com/user/Maildir/ - An entry in Postfix
virtual_mailboxes -
A hashed password in
/etc/dovecot/passwd.domain.com - A quota limit (configurable per-mailbox)
Mail Client Settings
| Protocol | Server | Port | Security |
|---|---|---|---|
| IMAP | mail.yourdomain.com |
993 | SSL/TLS |
| POP3 | mail.yourdomain.com |
995 | SSL/TLS |
| SMTP | mail.yourdomain.com |
587 | STARTTLS |
| SMTP | mail.yourdomain.com |
465 | SSL/TLS |
SMTP Relay
If outbound port 25 is blocked (common on cloud providers), configure SMTP relay in Admin → Settings → Server Settings. The panel supports relaying through another KWP server or any external SMTP relay.
Mail Repair
Go to Admin → Mail Delivery → Repair Mail Delivery to fix stuck emails caused by Dovecot LMTP crashes. This also runs automatically every 5 minutes via cron.
Webmail
Roundcube webmail is available at
https://webmail.yourdomain.com. Access it directly from
the user panel via the Webmail button.
Databases
KWP supports both MySQL (MariaDB) and MongoDB databases per account.
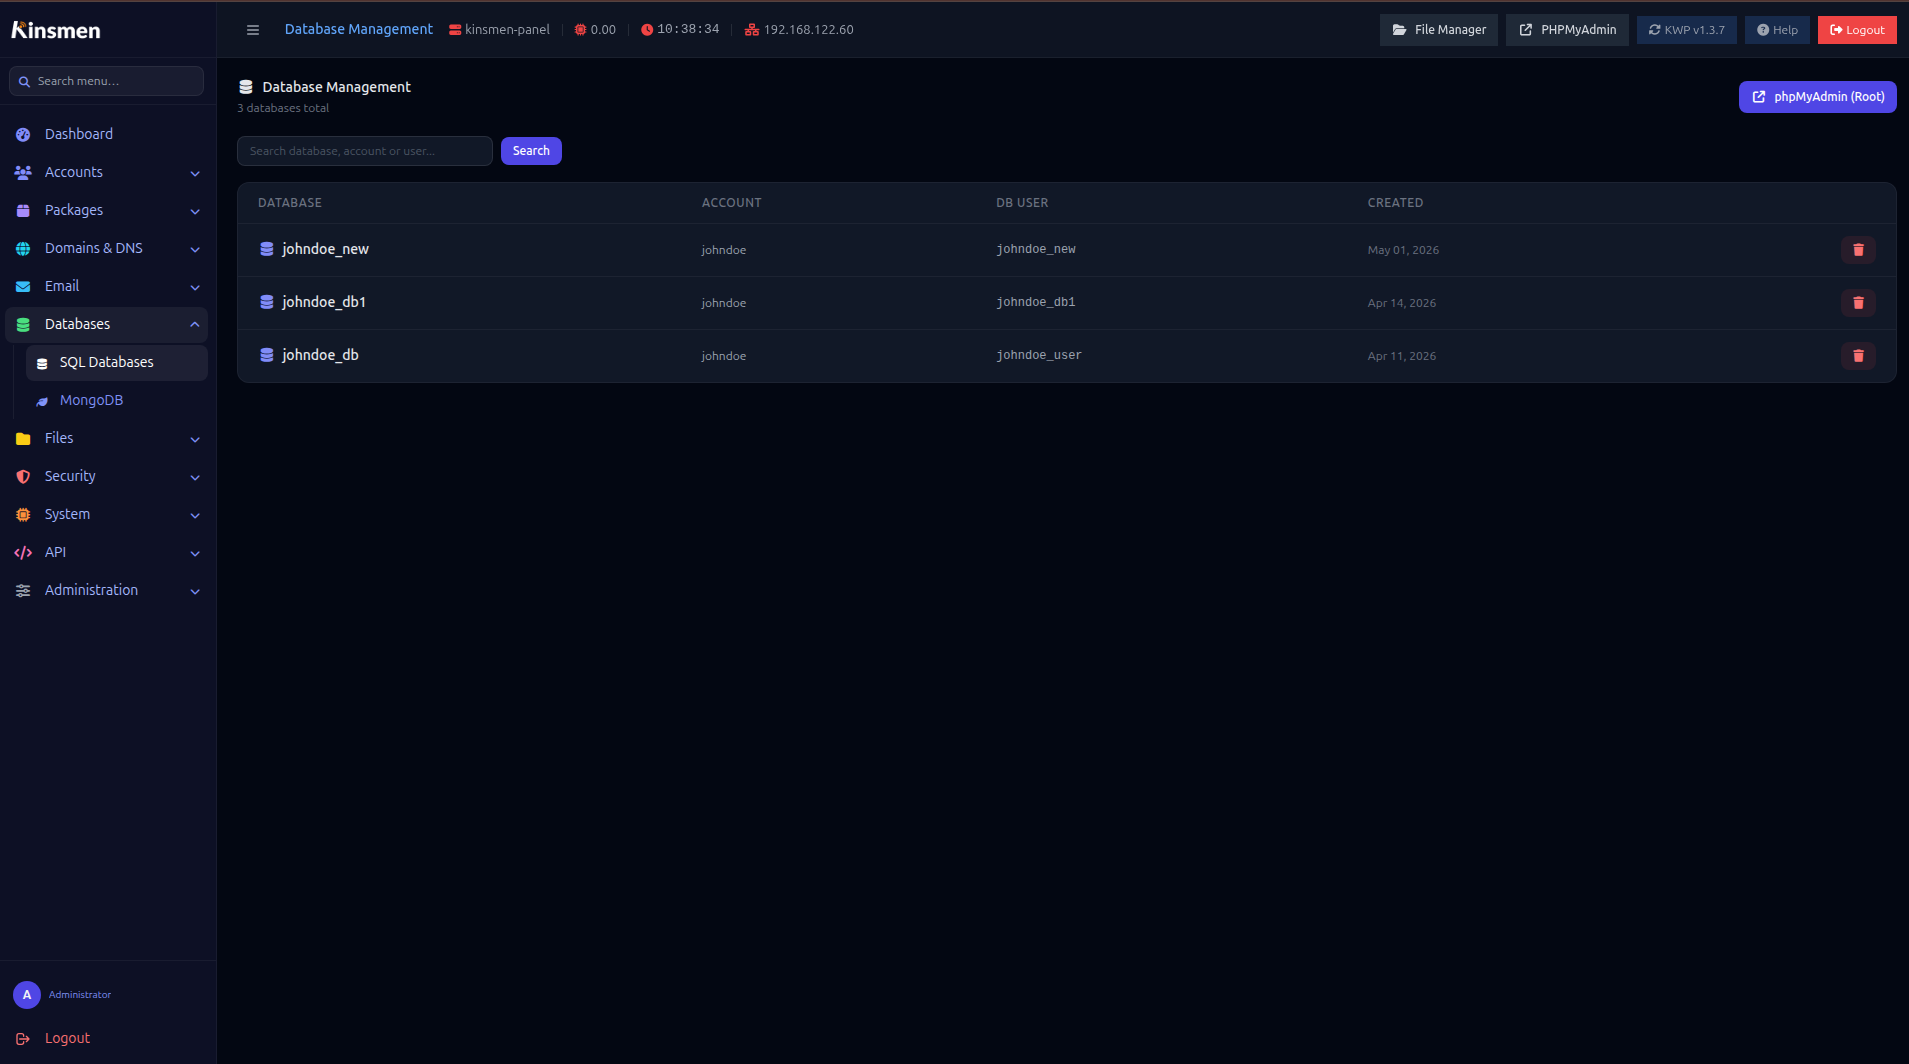
MySQL Databases
From the account detail page or Admin → Databases:
-
Create databases with auto-prefixed names (e.g.
username_dbname) - Passwords are stored and preserved across backups/restores
- Open phpMyAdmin with single sign-on (no separate login)
-
Dump — exports DB to
/home/username/dbname.sql -
Restore — imports from
/home/username/dbname.sql(file must exist first)
mydb.sql to /home/username/mydb.sql via
SFTP, create the empty database mydb in the panel, then
click Restore.
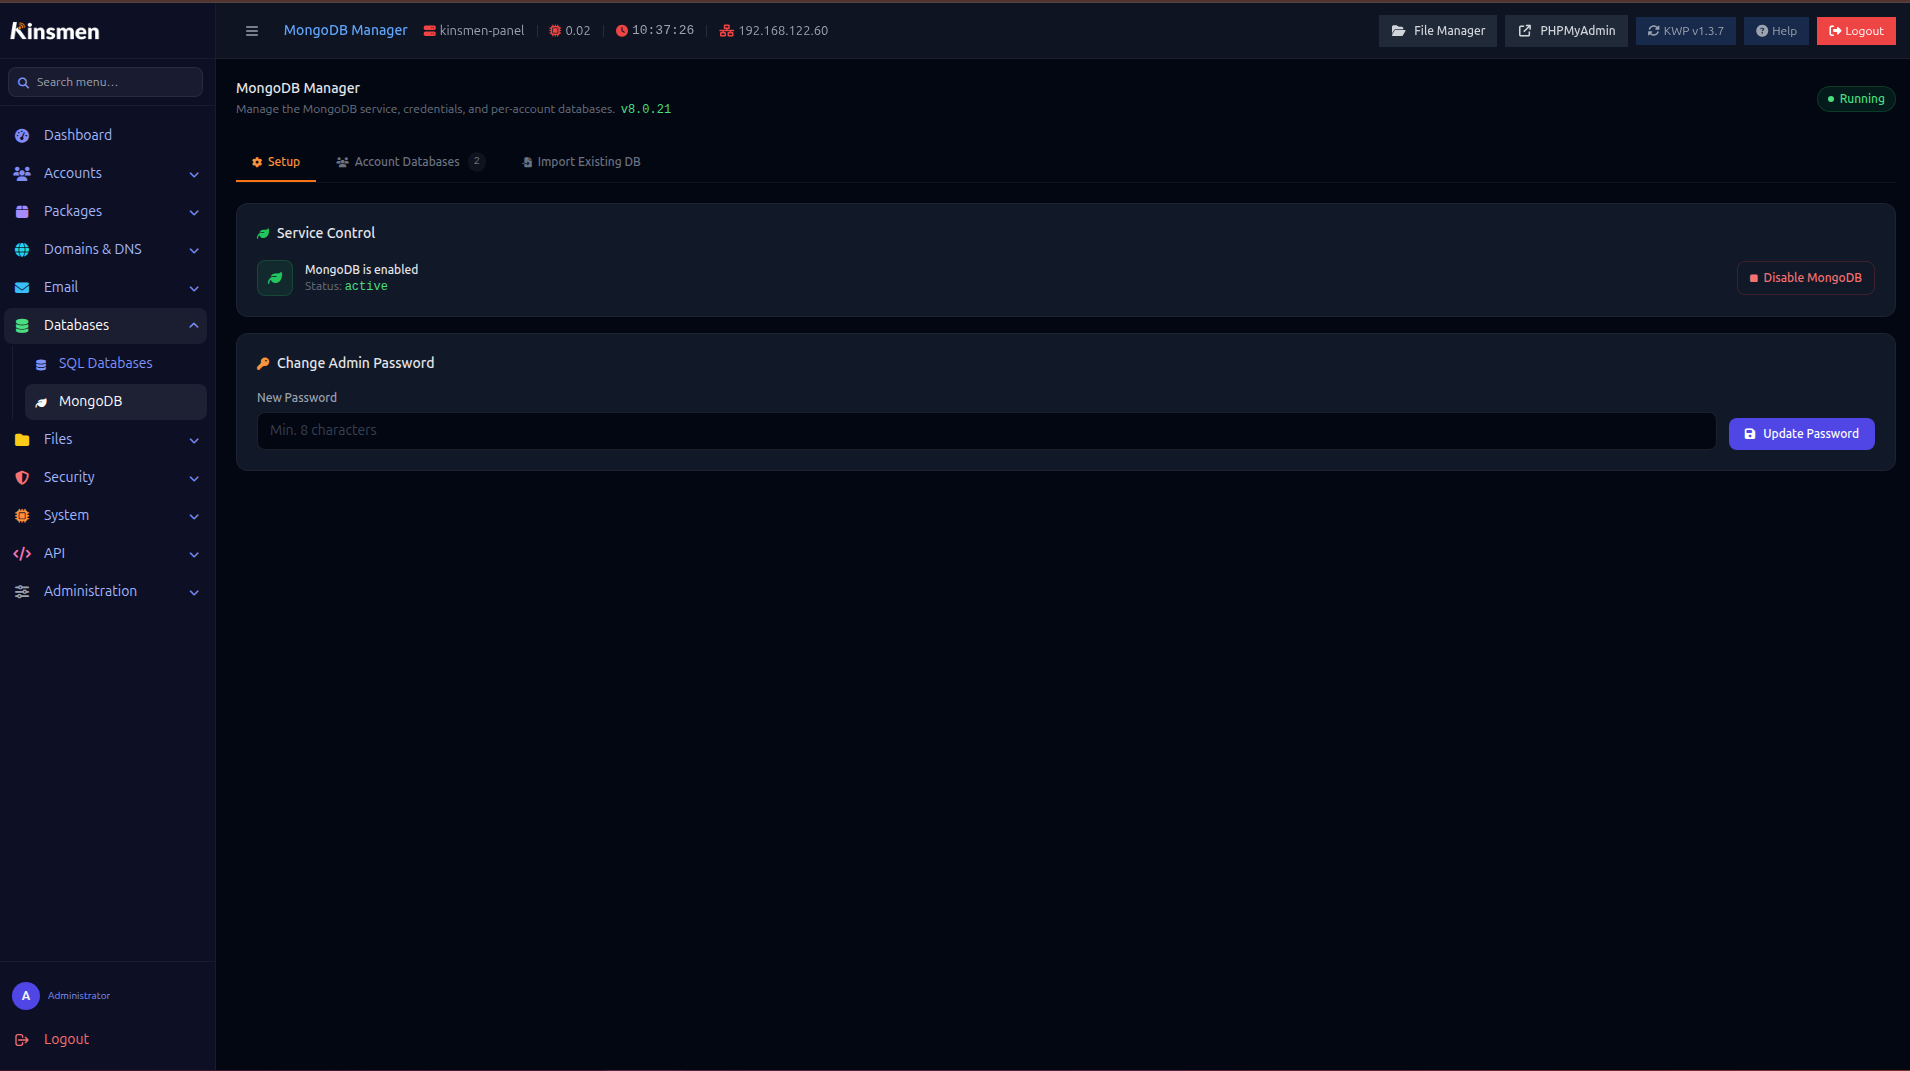
MongoDB Databases
If MongoDB is enabled on the server (Admin → MongoDB), accounts can create MongoDB databases with dedicated users. Connection strings are available in the user panel.
phpMyAdmin
Access phpMyAdmin at https://your-server:2095. Admin
auto-login is available from the admin panel. Each account can also
access their own databases via the user panel.
Backups
KWP includes both local and remote backup capabilities.
Local Backups
From Admin → Backups, create on-demand backups for any account. A backup includes:
- All files in
/home/username/ - All MySQL databases (SQL dumps)
- MongoDB databases (mongodump format)
- Email accounts and mail content (
/var/vmail/) - Account metadata (domain list, package, PHP version)
- Database credentials (for seamless restore)
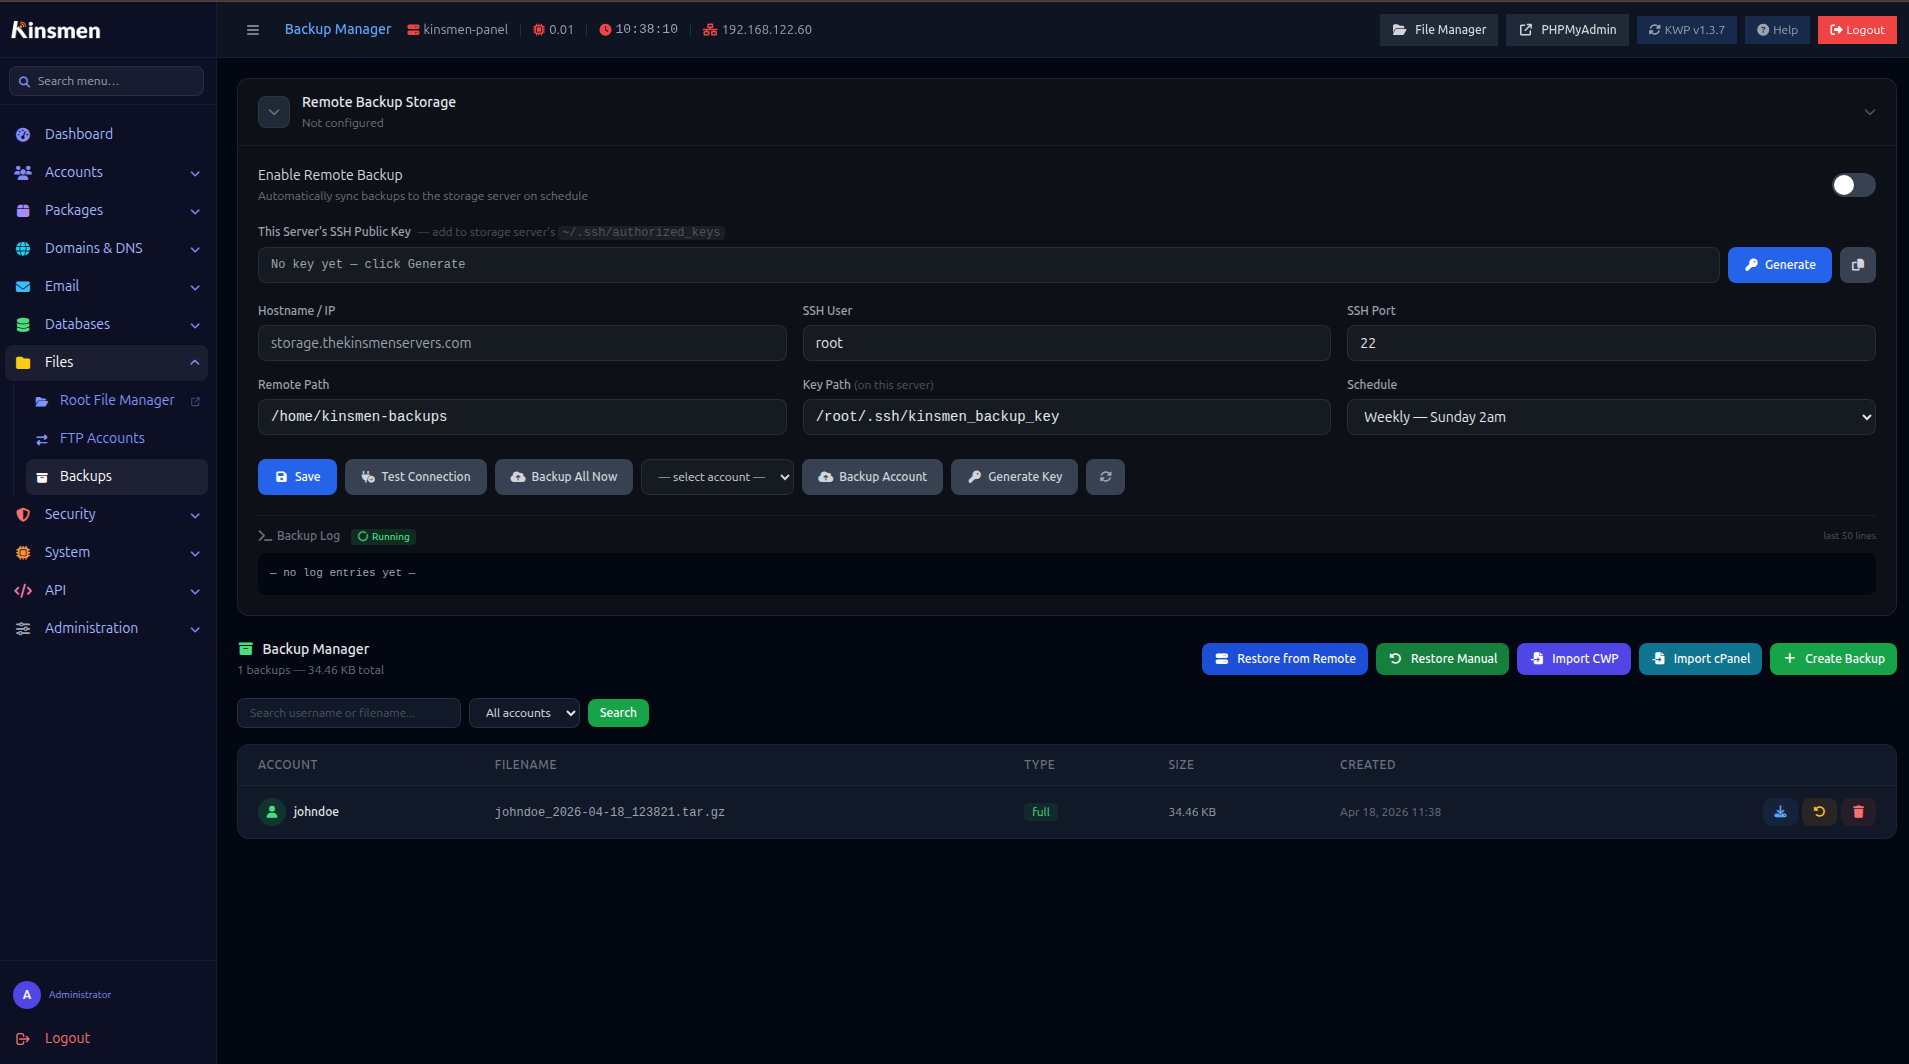
Remote Backups
Configure a remote backup server in Admin → Settings → Remote Backup. Supports SSH/rsync to any Linux server.
- Generate an SSH key pair using the Generate Key button
-
Add the public key to
~/.ssh/authorized_keyson the backup server - Test the connection with Test Connection
- Enable automated backups on a schedule (daily/weekly/monthly)
- Use Backup Account to back up a single account on demand
Restore
To restore a remote backup:
- Click Restore from Remote on the backups page
- Select the server and account
- Choose the backup file
- Click Restore — files, databases, email accounts, and DNS are all restored automatically
wp-config.php and
other config files do not need manual password updates.
Backup Log
The live backup log is shown directly in the Remote Backup card on the backups page. It updates in real-time while a backup is running and shows the last 50 lines of the log.
PHP Manager
Go to Admin → PHP Manager to install, remove, and configure PHP versions server-wide.
Supported Versions
KWP supports PHP 7.4, 8.1, 8.2, and 8.3 simultaneously via Remi SCL repositories. Each account can run a different PHP version.
PHP Extensions
Install or remove extensions per PHP version. Common extensions (redis, imagick, gd, zip, mbstring, etc.) are available with a single click.
Per-Account PHP Settings
PHP settings can be customised per-account via User Panel → PHP Settings. Adjustable values include:
memory_limit-
upload_max_filesizeandpost_max_size max_execution_timedisable_functions- Custom
php.inivalues
Node.js Manager
KWP supports running Node.js applications per account. Go to Admin → Node.js to manage all apps across all accounts.
Creating a Node.js App (User Panel)
Navigate to Node.js
In the user panel, go to Node.js Apps.
Create the app
Enter app name, select the domain, set the entry file (e.g.
app.js), port, and root path. Optionally run
npm install immediately from the modal.
Start the app
Click Start. The panel configures nginx to proxy requests to the app's port and starts it with PM2-style process management.
Deploy code changes
Upload new files via SFTP or the file manager, then click Restart in the Node.js apps list.
npm Install
The npm Install button runs
npm install in the app's root directory. Flags
(--production, --legacy-peer-deps, --force) can be selected from the
modal.
Security
Firewall
Go to Admin → Firewall to manage firewalld rules. Add/remove allowed ports, block specific IPs, and view the current ruleset.
ModSecurity
Admin → ModSecurity controls the Web Application Firewall. Toggle ModSecurity per domain and view recent blocks and alerts. The panel ships with a pre-configured whitelist for KWP itself.
SELinux
Manage SELinux mode from Admin → SELinux:
- Permissive — logs violations without blocking (recommended for most setups)
- Enforcing — actively blocks policy violations (may break some apps)
- Disabled at boot — disables SELinux on next reboot
You can also mask/unmask the setroubleshootd daemon
which can consume significant CPU on busy servers.
Shell Access
By default, hosting accounts have /sbin/nologin as
their shell. Go to Admin → Shell Access to grant or
revoke SSH access per account.
IP Manager
Manage IP addresses assigned to the server. Block specific IPs from accessing hosted sites or the panel itself.
Two-Factor Authentication
Enable TOTP 2FA for the admin login at Admin → Two-Factor Auth. Supported with any TOTP app (Google Authenticator, Authy, Bitwarden, etc.).
Services
Go to Admin → Services to start, stop, and restart core server services without SSH access.
Manageable services: nginx, Apache httpd, MariaDB, Postfix, Dovecot, BIND (named), Redis, PHP-FPM (all versions), OpenDKIM, SpamAssassin.
WooCommerce Mode
WooCommerce Mode is a one-click optimisation for accounts running WooCommerce ecommerce sites. Click the WooCommerce button on any account's detail page to enable it.
What it enables
-
Scaled PHP workers — automatically calculates
worker count based on number of WordPress installs:
(sites × 6) + 4workers - WooCommerce-aware nginx cache — caches product and category pages, but automatically bypasses cache for cart, checkout, my-account, and any WooCommerce AJAX requests
-
Memory limits — patches all
wp-config.phpfiles withWP_MEMORY_LIMIT=256M,WC_MEMORY_LIMIT=256M, andWP_MAX_MEMORY_LIMIT=512M - Extended timeout — sets request_terminate_timeout to 120 seconds for long-running cart/checkout operations
Cache bypass rules
When cache is enabled for a WooCommerce site, the following requests always bypass the cache:
- All POST requests (form submissions, add-to-cart)
-
URLs with query strings (WC AJAX calls use
?wc-ajax=) - WordPress admin, login, cron pages
-
/cart/,/checkout/,/my-account/,/wc-api/,/wp-json/wc/ - Logged-in users (WordPress session cookie present)
-
Active WooCommerce sessions (
woocommerce_items_in_cartcookie present)
Notifications
Admins can send notifications to individual users or broadcast to all users.
Sending a Notification
From any account's detail page, click Send Notification. Enter a title and message. Enable Broadcast to send to all accounts simultaneously.
User Experience
Users see notifications via:
- The bell icon in the top navigation bar — shows an unread count badge and a dropdown with the 5 most recent messages
- An amber warning bar in the dashboard if they have unread notifications
-
The full
Notifications page
(
/panel/notifications) with the complete list and delete options
The bell badge updates every 60 seconds automatically and immediately after a backup is triggered.
Settings
Settings are split into dedicated pages accessible from Admin → Administration in the sidebar.
| Page | What you configure |
|---|---|
| Server Settings | Hostname, server IP, nameservers (NS1/NS2), SSH port. Apply to all DNS zones with bulk actions. |
| Branding | Panel logo, favicon, panel name, admin email, panel URL. Also the License Key field. |
| Announcement | A sticky HTML banner shown to all users in the user panel. Enable/disable without deleting the message. |
| Mail Delivery | SMTP settings for panel outbound email (password resets, notifications). Mail SNI repair button. |
| Host SSL | Issue a Let's Encrypt cert for the panel hostname (port 2083). |
| SELinux | Set SELinux mode; manage setroubleshootd. |
| Cloudflare DNS | API token, enable/disable per-domain, bulk recreate zones. |
| Admin Password | Change the panel admin login password (also updates the Linux root password). |
| Two-Factor Auth | Enable/disable TOTP 2FA for admin login. |
| Updates |
Check for panel updates. Apply via CLI:
bash /opt/kinsmen-panel/scripts/update_panel_kwp.sh
|
User Panel — Dashboard
The user panel (http://server:2082) is the
customer-facing interface. Each hosting account gets its own login.
The dashboard shows:
- Account resource usage (disk, bandwidth, email count, database count)
- Server nameservers for DNS delegation
- Recent login activity
- Quick-access feature cards
- Any active announcements from the admin
- Unread notification alert
User Panel — Domains
Users can manage their own domains, subdomains, and parked domains without admin intervention.
Adding an Addon Domain
Go to Domains
Navigate to Domains in the user panel sidebar.
Enter the domain
Type the domain name and select the PHP version. The domain must already be pointing to your server's nameservers.
Wait for SSL
The panel automatically queues an SSL certificate. Once DNS propagates (usually 1–5 minutes), HTTPS is active.
Nginx Cache
Each domain has a cache toggle. When enabled, nginx caches static pages for 1 hour. WooCommerce bypass rules apply automatically (see WooCommerce Mode).
Domain Redirects
Set up HTTP redirects (301/302) from any domain or path to another URL.
User Panel — Email
Users manage all email features from Email in their panel sidebar.
Features
- Email Accounts — create, delete, change passwords, set quotas
- Forwarders — forward an address to another email
- Autoresponders — vacation messages and auto-replies
-
PHP Mail — configure SMTP credentials for
wp_mail()/ PHPmail() - Spam Filter — SpamAssassin configuration
- Webmail — direct link to Roundcube for each email account
mail() is disabled by default. Users must configure
their own SMTP credentials under
Email → PHP Mail to send email from their
applications.
User Panel — Databases
Users can create and manage MySQL and MongoDB databases from their panel.
MySQL
- Create databases — names are automatically prefixed with username
- Create additional database users with specific permissions
- Change database user passwords
- Open phpMyAdmin with automatic sign-on
MongoDB
If enabled by the admin, users can create MongoDB databases. The connection string and credentials are displayed in the panel.
User Panel — FTP
Create FTP accounts for uploading files. Each FTP account is scoped to a specific directory.
| Setting | Value |
|---|---|
| FTP Host | ftp.yourdomain.com |
| Port | 21 |
| Protocol | FTP with Explicit TLS (FTPES) |
| Username | FTP account username |
User Panel — Backups
Users can create, download, and restore their own backups without admin help.
- Create Backup — packages files + databases into a single archive
- Download — download the archive directly from the browser
- Restore — restore a previously created backup
- Restore from CWP / cPanel — import backups from CWP or cPanel format (for migrations)
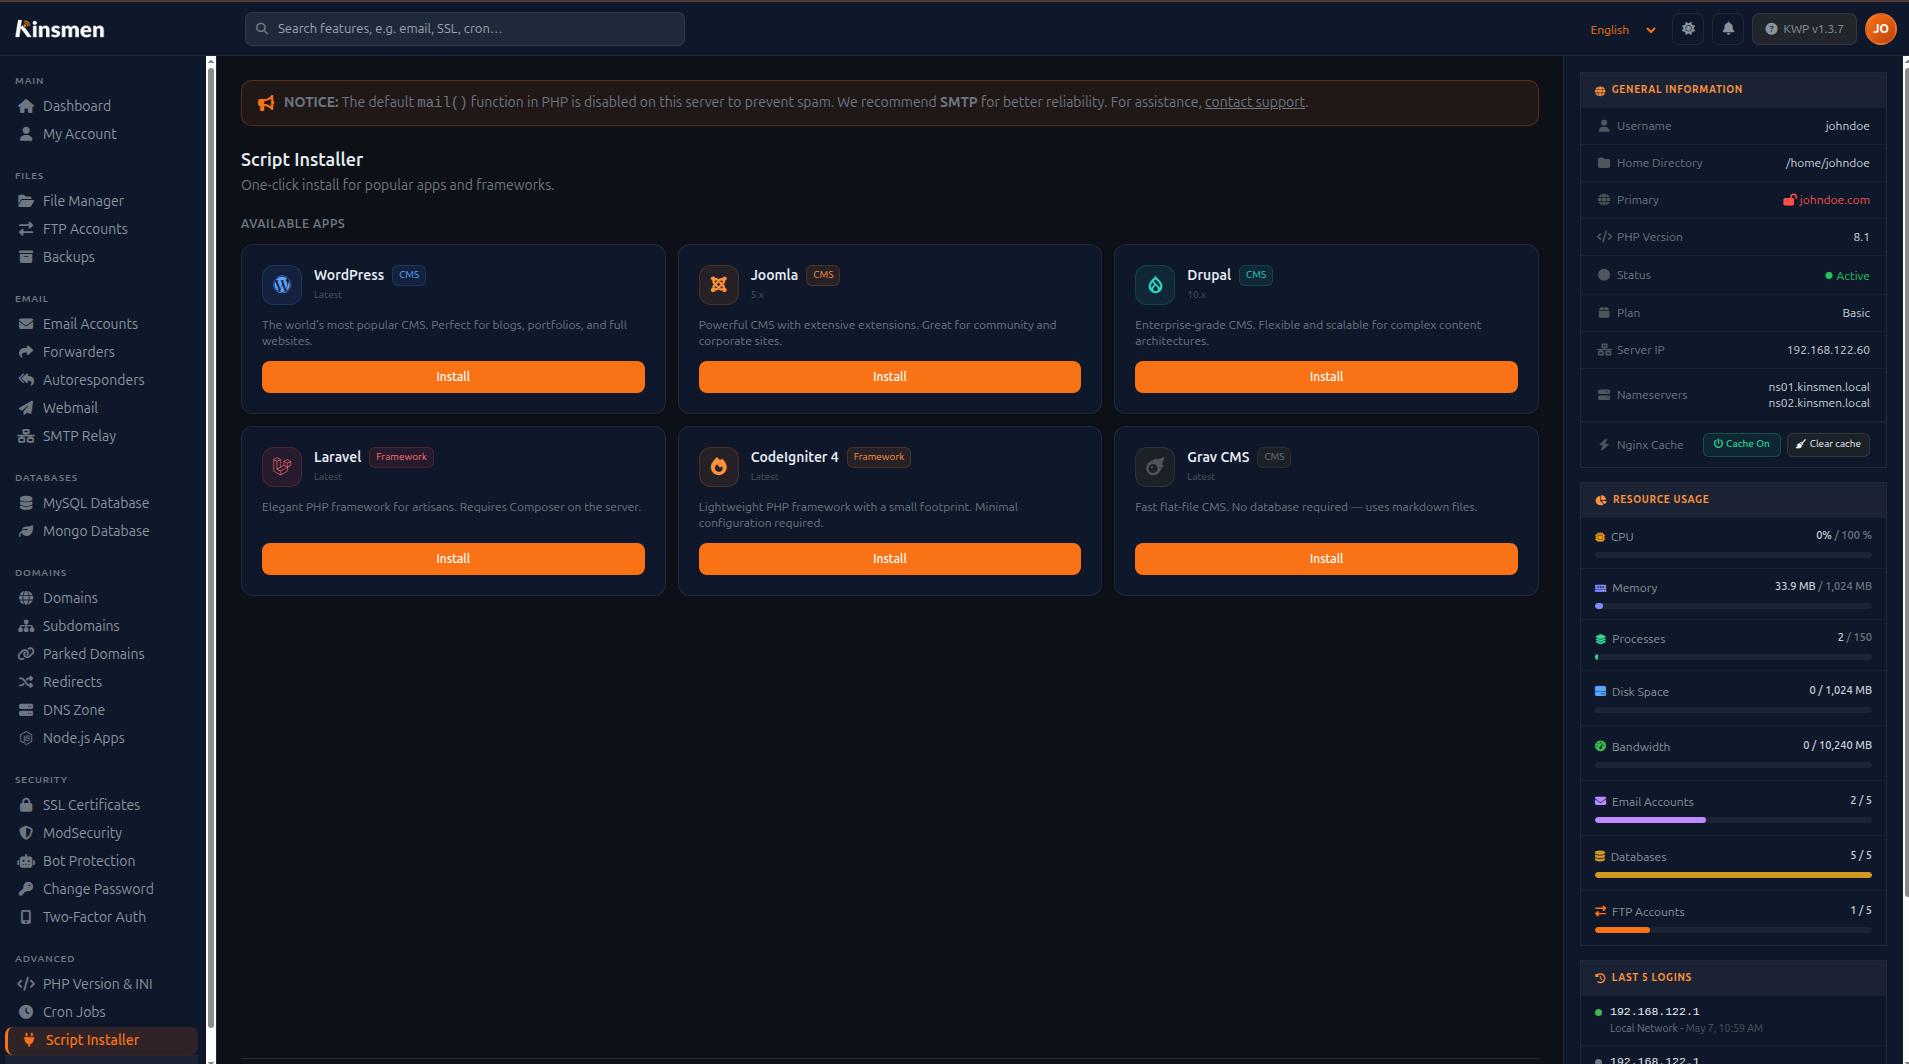
Script Installer
The script installer (accessible from the user panel) allows one-click installation of popular web applications.
Supported Applications
WordPress
+ WooCommerce ready
Joomla 5
CLI installer
Drupal
Latest stable
Laravel
Via Composer
CodeIgniter 4
Via Composer
Grav CMS
Flat-file CMS
WordPress Installation
Open Script Installer
Navigate to Script Installer in the user panel.
Select WordPress
Click the WordPress card. Choose the domain, installation path
(/ for root or /blog for
subdirectory), and create a database.
Set admin credentials
Enter the WordPress admin username, password, and email. Use the generate button for the password.
Install
Click Install. The panel downloads WordPress, runs the database setup (via WP-CLI if available, PHP bootstrap otherwise), and configures Redis object cache automatically.
User Panel — Node.js Apps
Run Node.js applications alongside traditional PHP hosting on the same account.
Creating a Node.js App
-
Set the app name,
entry file (e.g.
app.js), and port - Assign a domain — nginx proxies traffic from that domain to your app's port
- Run npm install directly from the panel after creation
App Controls
From the Node.js apps list: Start, Stop, Restart, npm Install, view Logs, and Delete.
CLI Reference
All panel actions are backed by shell scripts in
/opt/kinsmen-panel/scripts/. Every script must be run
as root. Scripts that modify panel state (accounts,
DNS zones, email) also update the SQLite panel database so changes
are reflected immediately in the UI.
apache with a sudoers rule
allowing it to call these scripts. Running them directly as root
achieves the same result.
Accounts
| Action | Command |
|---|---|
| Create account | bash /opt/kinsmen-panel/scripts/create_account.sh <username> <password> <domain> [php_version] |
| Terminate account | bash /opt/kinsmen-panel/scripts/terminate_account.sh <username> |
| Suspend account | bash /opt/kinsmen-panel/scripts/suspend_account.sh <username> |
| Unsuspend account | bash /opt/kinsmen-panel/scripts/unsuspend_account.sh <username> |
| Change admin password | bash /opt/kinsmen-panel/scripts/change_admin_password.sh <new_password> |
Domains
| Action | Command |
|---|---|
| Add addon / subdomain | bash /opt/kinsmen-panel/scripts/add_domain.sh <username> <domain> [php_version] |
| Remove domain | bash /opt/kinsmen-panel/scripts/remove_domain.sh <username> <domain> |
| Set PHP version | bash /opt/kinsmen-panel/scripts/set_php_version.sh <username> <domain> <version>Version: 7.4, 8.1, 8.3 |
| Fix permissions | bash /opt/kinsmen-panel/scripts/fix_permission.sh <username> |
DNS
| Action | Command |
|---|---|
| Create DNS zone | bash /opt/kinsmen-panel/scripts/create_dns_zone.sh <domain> <ip> <ns1> <ns2> |
| Delete DNS zone | bash /opt/kinsmen-panel/scripts/delete_dns_zone.sh <domain> |
SSL
| Action | Command |
|---|---|
| Issue Let's Encrypt cert | bash /opt/kinsmen-panel/scripts/issue_ssl.sh <domain> <username> <email> [force] [rfc2136|cloudflare] |
| Revoke cert | bash /opt/kinsmen-panel/scripts/revoke_ssl.sh <domain> <username> |
| Apply mail SNI (all domains) | bash /opt/kinsmen-panel/scripts/setup_mail_sni.sh [--rebuild]--rebuild clears stale entries first |
| Action | Command |
|---|---|
| Create email account | bash /opt/kinsmen-panel/scripts/create_email.sh <username> <email> <password> [quota_mb] |
| Delete email account | bash /opt/kinsmen-panel/scripts/delete_email.sh <email> |
| Change email password | bash /opt/kinsmen-panel/scripts/change_email_password.sh <email> <new_password> |
| Configure SMTP relay | bash /opt/kinsmen-panel/scripts/setup_smtp_relay.sh <username> <domain> <smtp_host> <port> <smtp_user> <smtp_pass> [from_email] [tls|ssl|none] |
| Clear mail queue | bash /opt/kinsmen-panel/scripts/clear_mail_queue.sh |
FTP
| Action | Command |
|---|---|
| Create FTP account | bash /opt/kinsmen-panel/scripts/create_ftp.sh <username> <ftp_user> <ftp_pass> <directory>Directory is relative to /home/<username>/, e.g. public_html |
| Delete FTP account | bash /opt/kinsmen-panel/scripts/delete_ftp.sh <ftp_user> |
| Change FTP password | bash /opt/kinsmen-panel/scripts/change_ftp_password.sh <ftp_user> <new_password> |
Databases
| Action | Command |
|---|---|
| Export database | bash /opt/kinsmen-panel/scripts/dump_db.sh <db_name> <output_file> [owner] |
| Import database | bash /opt/kinsmen-panel/scripts/restore_db.sh <db_name> <sql_file> |
Backups
| Action | Command |
|---|---|
| Create account backup | bash /opt/kinsmen-panel/scripts/create_backup.sh <username> <account_id>Backup saved to /home/<username>/backups/ |
| Restore from backup | bash /opt/kinsmen-panel/scripts/restore_backup.sh <username> <backup_file_path> |
Node.js Apps
| Action | Command |
|---|---|
| Start app | bash /opt/kinsmen-panel/scripts/nodejs_app.sh start <username> <app_name> <port> <entry_file> <root_path> |
| Stop app | bash /opt/kinsmen-panel/scripts/nodejs_app.sh stop <username> <app_name> |
| Restart app | bash /opt/kinsmen-panel/scripts/nodejs_app.sh restart <username> <app_name> |
| Delete app | bash /opt/kinsmen-panel/scripts/nodejs_app.sh delete <username> <app_name> |
System
| Action | Command |
|---|---|
| Fix panel (FPM + nginx restart) | bash /opt/kinsmen-panel/scripts/fix_panel.sh |
| Reload all services | bash /opt/kinsmen-panel/scripts/reload_services.sh |
| Clear panel cache | bash /opt/kinsmen-panel/scripts/clear_cache.sh |
| Clear server logs | bash /opt/kinsmen-panel/scripts/clear_logs.sh |
| Enable PHP hardening | bash /opt/kinsmen-panel/scripts/php-harden.sh |
| Disable PHP hardening | bash /opt/kinsmen-panel/scripts/php-unharden.sh |
| Update panel | bash /opt/kinsmen-panel/scripts/update_panel_kwp.sh |
License Management
KWP requires an active license key tied to your server's IP address. Licenses are managed at client.thekinsmen.net.
Entering Your License Key
- Purchase a license at client.thekinsmen.net
- In the admin panel, go to Admin → Branding
- Scroll to the License section
- Enter your license key and click Save & Verify
License States
| State | Behaviour |
|---|---|
| Active | Full panel functionality. No warnings shown. |
| Grace | License expired within 7 days. Warning banner shown. Full functionality retained. |
| Unconfigured | No license key entered. Warning banner shown in admin. Panel still functional during trial. |
| Blocked | Expired past grace period or suspended. Panel shows license error page. Renew to restore access. |
Updating the Panel
When a new version is available, an "Update Available" badge appears in Admin → Updates. Apply the update by running on the server:
bash /opt/kinsmen-panel/scripts/update_panel_kwp.shThe updater verifies your license, downloads only changed files, runs database migrations, and reloads services automatically.
Troubleshooting
503 Service Unavailable on websites
Cause: PHP-FPM pool crashed or socket missing.
Fix: Use the Fix 503 Errors button on the admin dashboard, or run:
bash /opt/kinsmen-panel/scripts/fix_503.shHigh Server Load with Low CPU
Cause: D-state (uninterruptible I/O wait) processes from one or more accounts — typically caused by a bloated WordPress database (spam users, transients, stale WooCommerce sessions).
Fix: Use the Fix High Load button, or:
# Kill D-state workers for a specific account
pkill -9 -u username -f php-fpm

# Clear swap
swapoff -a && swapon -a

# Check D-state count
ps aux | awk '$8=="D"' | wc -l
Prevention: Enable WooCommerce Mode, enable Redis object cache, and regularly clean bloated database tables.
DNS Zone Records Disappeared
Cause: BIND journal conflict — the
.jnl file's in-memory state overwrote the zone file.
Fix: The zone heal in
update_panel.sh detects and auto-repairs blank zones on
every update. To manually fix:
bash /opt/kinsmen-panel/scripts/create_dns_zone.sh domain.com SERVER_IP NS1 NS2SSL Certificate Not Issuing
Cause: DNS hasn't propagated, or the RFC2136 TSIG key is misconfigured.
Check:
# Verify DNS resolves to your server
dig +short domain.com @8.8.8.8

# Check certbot logs
journalctl -u certbot --since "1 hour ago" | tail -30
Email Not Delivering (504 Timeout)
Cause: Dovecot LMTP crash due to corrupted mailbox index.
Fix: Use Admin → Mail Delivery → Repair Mail Delivery, or it auto-repairs every 5 minutes via cron.
phpMyAdmin Shows SSL Warning
Cause: The phpMyAdmin nginx vhost doesn't have SSL configured.
Fix: Run on the server:
bash /opt/kinsmen-panel/scripts/setup-phpmyadmin.shWooCommerce Cart Not Working with Cache
Cause: Cache is enabled without WooCommerce bypass rules.
Fix: Enable WooCommerce Mode (button on account detail page). This applies smart cache bypass rules that cache product pages but never cache cart/checkout.
Node.js App 502 Bad Gateway
Cause: The app crashed, isn't running, or is using the wrong port.
Fix: Go to User Panel → Node.js Apps → Restart the app. Check the app logs for errors.
Frequently Asked Questions
Can I migrate from cPanel or CWP?
Yes. The backup restore supports importing cPanel full backups and CWP (Control Web Panel) backup format. Go to Admin → Backups → Import cPanel or Import CWP.
How many websites can I host?
There is no hard limit. Account and domain limits are defined per Package. Server resources (CPU, RAM, disk) are the practical limit.
Can I run multiple PHP versions on the same server?
Yes. KWP runs PHP 7.4, 8.1, 8.2, and 8.3 simultaneously via Remi SCL. Each domain can use a different version, and you can change it at any time without affecting other accounts.
How is each account isolated?
Each account runs as its own Linux user with a dedicated PHP-FPM
pool. File system access is restricted via
open_basedir. Accounts cannot read each other's files.
Does KWP support WHMCS integration?
Yes. KWP includes a WHMCS integration module. Configure your WHMCS URL, API credentials, and identifier/secret in Admin → Settings → Server Settings. Accounts created in WHMCS are automatically provisioned.
Can I use Cloudflare with KWP?
Yes. Enter your Cloudflare API token in Admin → Cloudflare DNS. Cloudflare DNS management is opt-in per domain — not automatic. The orange cloud proxy is enabled automatically after SSL is issued for each domain.
How do I change the admin password?
Go to Admin → Admin Password. This updates both the panel login password and the Linux root password simultaneously.
What happens if my license expires?
After expiry, you have a 7-day grace period where the panel continues to work with an amber warning banner. After the grace period, the panel shows a license error page. Renewing your license at client.thekinsmen.net restores access within minutes (next license check cycle).
Can I move the panel to a different server IP?
Yes. Update the registered IP in your license at client.thekinsmen.net. The panel will re-verify automatically on the next check cycle (within 24 hours, or immediately after saving the license key).
Where are backups stored on the server?
Local backups are stored in /home/backups/username/.
Remote backups are transferred via rsync to your configured backup
server and the local copy is removed after successful transfer.